
Overview of Remote Desktop Functionality
Remote Desktop Setup has become an essential tool for businesses and individuals alike, allowing access to computers from virtually anywhere. The process provides convenience and efficiency, enhancing productivity by enabling work from remote locations. Accessing the Lenovo ThinkCentre M720q Tiny through remote desktop services exemplifies the practicality of this technology in various scenarios.
The Lenovo ThinkCentre M720q is highly suitable for remote desktop applications due to its compact size and robust remote control features. Its hardware specifications and pre-installed software streamline the remote desktop process, ensuring a smooth and secure connection.
Also to read : Unlocking the Full Potential of Your 10GbE Network with TP-Link TL-SX1008: The Ultimate Guide,slugslug
There are several common use cases for remote desktop access:
- Telecommuting and remote work: Employees can access their office computers from home, viewing files and using applications seamlessly.
- Technical support: IT professionals can diagnose and fix issues on client computers without needing physical presence.
- Access to specific software: Users can run industry-specific software housed on a principal computer from different locations.
These functionalities underline the diverse capabilities and utility of remote desktop services, which are vital in today’s digitally connected world. By leveraging the Lenovo ThinkCentre M720q’s attributes, users can enjoy a reliable and efficient remote desktop experience, meeting a variety of professional and personal requirements.
Also read : Supercharge Your Dell Precision 5540 for Rapid Blender 3D Rendering: Pro Tips for Optimal Performance
System Requirements and Preparations
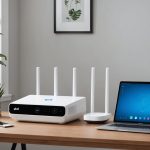
When planning a remote desktop setup on the Lenovo ThinkCentre M720q, understanding the system requirements is vital. This ensures a seamless remote desktop experience. The primary requirement includes a Windows 10 Pro or higher operating system, which supports the necessary remote desktop functionality. Additionally, a reliable internet connection is crucial for maintaining uninterrupted sessions.
Before diving into the installation of remote desktop software, it is wise to verify the device’s processor and RAM capabilities. The Lenovo ThinkCentre M720q typically comes with an Intel Core processor and at least 8GB of RAM, ideally suited for remote tasks. These Lenovo specifications help in assessing the machine’s readiness for handling remote desktop applications efficiently.
To set the stage for an effective remote desktop setup, consider pre-installation checks such as confirming the update status of the operating system, ensuring that necessary drivers are current, and enabling key settings that facilitate remote access. Recommended software for establishing remote connections includes Microsoft’s built-in Remote Desktop Software and third-party applications like TeamViewer. Engaging with these preparations enhances the user experience by streamlining the installation process and securing optimal performance.
Step-by-Step Guide to Setting Up Remote Desktop
Setting up a Remote Desktop Setup on your Lenovo ThinkCentre M720q is straightforward with this guide. The setup process involves installing necessary software, configuring settings, and managing user accounts, all vital for effective remote access.
Installing Necessary Software
To begin, download and install remote desktop software, like Microsoft Remote Desktop or TeamViewer. This software enables the establishment of secure connections between devices. Ensure compatibility with the Lenovo specifications, and follow the on-screen installation instructions for a smooth setup experience.
Configuring Windows Settings
Configuring Windows settings is crucial for remote access. Navigate to Settings > System > Remote Desktop on your Lenovo ThinkCentre M720q. Enable “Remote Desktop” and allow connections from devices running any version of Remote Desktop. For additional security, restrict access to approved devices only.
Setting Up User Accounts
Creating specific user accounts enhances security. In Control Panel > User Accounts, add new users that require remote access. Set robust passwords and assign appropriate privileges based on their needs. This step ensures secure and effective remote control features.
Following these installation steps and configurations will optimise your Remote Desktop Setup Guide for secure, efficient access.
Security Best Practices for Remote Desktop
Remote Desktop Security is crucial in protecting sensitive data when accessing systems remotely. Ensuring a secure connection involves robust security measures. One fundamental practice is enabling firewalls, which act as barriers against unauthorised access. Make sure the firewall settings allow specific ports used by remote desktop connections while blocking any unnecessary ones.
Encryption is another key tool, safeguarding data during transmission. Use protocols such as TLS (Transport Layer Security) to encrypt remote desktop sessions, ensuring data privacy and integrity. Implementing strong password policies is essential. Encourage users to create complex passwords and change them regularly to prevent breaches.
To enhance security further, consider using multi-factor authentication (MFA). This adds an extra layer of protection by requiring users to verify their identity through multiple steps, such as a password and a code sent to their mobile device.
Avoid common security pitfalls like relying solely on default settings. Regularly update and patch software to close security vulnerabilities. Educate users on safe remote desktop practices, including recognising phishing attempts. By adhering to these best practices, remote work environments can remain secure and efficient.
Troubleshooting Common Issues
Encountering obstacles with Remote Desktop Troubleshooting is not uncommon. Thankfully, addressing these issues can often be straightforward. Here are some Common Issues and their fixes:
-
Connection Errors: Users often face trouble connecting remotely. Ensure that both the host and client devices are connected to the internet. Incorrect IP addresses can also hinder connections. Verify the IP and network settings on both ends.
-
Performance Lag: Remote sessions may experience delays. This could be due to inadequate bandwidth. Check your network speeds and close any unnecessary applications that might be consuming bandwidth.
-
Display Problems: The display might not adjust properly. Adjust the resolution settings on the remote session or ensure that your graphic drivers are up to date.
-
Authentication Failures: Sometimes, login credentials are incorrect. Double-check the username and password. If using multi-factor authentication, ensure verification processes are completed.
For additional support, explore online support resources and community forums, where numerous users and experts share solutions. These resources can be invaluable when troubleshooting and finding effective fixes for Remote Desktop issues, ensuring you maintain a smooth and uninterrupted workflow.
Advanced Features and User Configurations
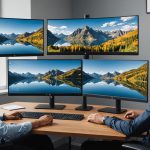
The advanced remote desktop features provide users with a range of functionalities that enhance the remote experience. Such capabilities include multiple monitor support, which allows users to mirror or expand their workspace across several screens, significantly improving multitasking efficiency. File transfer is another pivotal feature, enabling seamless movement of files between local and remote systems through drag-and-drop technology.
User Configurations
Customizable user configurations allow personalisation of the remote desktop environment to meet individual needs. Users can implement custom resolution settings, adapting screen size and orientation to suit their preferences or enhance readability. This flexibility extends to audio redirection, which enables the playing of media from the remote system on local speakers, essential for presentations and multimedia tasks.
Custom Settings
Optimising remote sessions involves strategic adjustment of performance settings. By choosing to reduce the colour depth or disable unnecessary visual effects, users can improve the speed and responsiveness of their connection, ensuring smoother interactions, especially where bandwidth is limited. Furthermore, establishing automatic reconnection ensures that any interruptions to the network are swiftly rectified, thus maintaining continuity in workflow. These configurations and settings make customization robust, facilitating tailored and effective remote desktop usage.
Frequently Asked Questions (FAQs)
To provide clarity on Remote Desktop FAQs, here’s a look at some common concerns and user queries. This section aims to address typical questions with precision and depth.
How do I ensure the best performance for my remote desktop session?
For optimal performance, adhere to recommended system requirements like using a compatible OS with Remote Desktop Software. Verify your device’s hardware meets Lenovo Specifications such as appropriate RAM and processor. Consider disabling unnecessary applications during remote sessions to free up bandwidth, and adjust performance settings like colour depth for seamless interactions.
What should I do if I encounter connectivity issues?
Remote Desktop Troubleshooting often involves checking internet connections and confirming correct IP addresses. Ensure both your host and client devices are online and verify any potential firewall settings that might obstruct connections. Consult community forums for additional fixes if difficulties persist.
Can I use a Lenovo ThinkCentre M720q for different remote desktop software?
Yes, the Lenovo ThinkCentre M720q supports various remote control features across different software. Choose applications that meet your specific needs while ensuring they are compatible with your device’s specifications for a secure and efficient Remote Desktop Setup.